Rsync(remote synchronize)是一个远程数据同步工具,可通过LAN/WAN快速同步多台主机间的文件,也可以使用 Rsync 同步本地硬盘中的不同目录。
Rsync 是用于取代rcp的一个工具,Rsync使用所谓的 “Rsync 算法” 来使本地和远程两个主机之间的文件达到同步,这个算法只传送两个文件的不同部分,而不是每次都整份传送,因此速度相当快。
Rsync支持大多数的类Unix系统,无论是Linux、Solaris还是BSD上都经过了良好的测试。此外,它在windows平台下也有相应的版本,比较知名的有cwRsync和Sync2NAS。
Rsync 的初始作者是 Andrew Tridgell 和 Paul Mackerras,它当前由 http://rsync.samba.org维护。
Rsync的基本特点如下:
1. 可以镜像保存整个目录树和文件系统;
2. 可以很容易做到保持原来文件的权限、时间、软硬链接等;
3. 无须特殊权限即可安装;
4. 优化的流程,文件传输效率高;
5. 可以使用rcp、ssh等方式来传输文件,当然也可以通过直接的socket连接;
6. 支持匿名传输,以方便进行网站镜像。
在使用 rsync 进行远程同步时,可以使用两种方式:远程 Shell 方式(建议使用 ssh,用户验证由 ssh 负责)和 C/S 方式(即客户连接远程 rsync 服务器,用户验证由 rsync 服务器负责)。
无论本地同步目录还是远程同步数据,首次运行时将会把全部文件拷贝一次,以后再运行时将只拷贝有变化的文件(对于新文件)或文件的变化部分(对于原有文件)。
rsync 在首次复制时没有速度优势,速度不如 tar,因此当数据量很大时您可以考虑先使用 tar 进行首次复制,然后再使用 rsync 进行数据同步。
系统平台:CentOS 6
rsync 版本:rsync-3.0.9-2.el6.rfx.x86_64.rpm
rsync 服务器:TS-DEV (172.16.1.135)
rsync 客户端:TS-CLIENT (172.16.1.136)
# rpm -qa|grep rsync
# wget http://pkgs.repoforge.org/rsync/rsync-3.0.9-2.el6.rfx.x86_64.rpm
# rpm -ivh rsync-3.0.9-2.el6.rfx.x86_64.rpm
•首先要选择服务器启动方式
•对于负荷较重的 rsync 服务器应该使用独立运行方式
•对于负荷较轻的 rsync 服务器可以使用 xinetd 运行方式
•创建配置文件 rsyncd.conf
•对于非匿名访问的 rsync 服务器还要创建认证口令文件
CentOS 默认以 xinetd 方式运行 rsync 服务。rsync 的 xinetd 配置文件在 /etc/xinetd.d/rsync。要配置以 xinetd 运行的 rsync 服务需要执行如下的命令:
# chkconfig rsync on
# service xinetd restart
最简单的独立运行 rsync 服务的方法是执行如下的命令:
# /usr/bin/rsync --daemon
您可以将上面的命令写入 /etc/rc.local 文件以便在每次启动服务器时运行 rsync 服务。
两种 rsync 服务运行方式都需要配置 rsyncd.conf,配置文件 rsyncd.conf 默认在 /etc 目录下,为了将所有与 rsync 服务相关的文件放在单独的目录下,可以执行如下命令:
# mkdir /etc/rsyncd
# touch /etc/rsyncd/rsyncd.conf
# ln -s /etc/rsyncd/rsyncd.conf /etc/rsyncd.conf
配置文件 rsyncd.conf 由全局配置和若干模块配置组成。配置文件的语法为:
•模块以 [模块名] 开始
•参数配置行的格式是 name = value ,其中 value 可以有两种数据类型:
•字符串(可以不用引号定界字符串)
•布尔值(1/0 或 yes/no 或 true/false)
•以 # 或 ; 开始的行为注释
•\ 为续行符
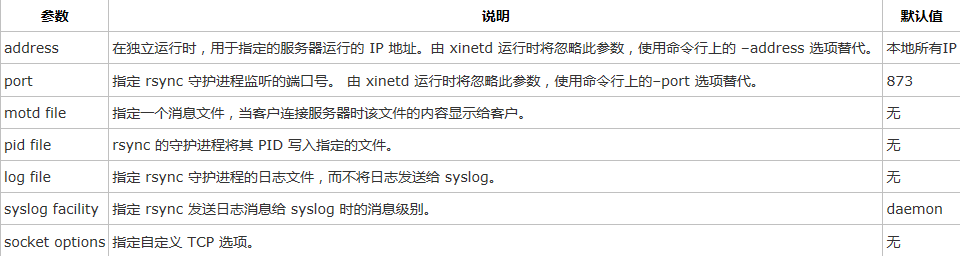
全局参数
在文件中 [module] 之外的所有配置行都是全局参数。当然也可以在全局参数部分定义模块参数,这时该参数的值就是所有模块的默认值。
模块参数
模块参数主要用于定义 rsync 服务器哪个目录要被同步。模块声明的格式必须为 [module] 形式,这个名字就是在 rsync 客户端看到的名字,类似于 Samba 服务器提供的共享名。而服务器真正同步的数据是通过 path 来指定的。可以根据自己的需要,来指定多个模块,模块中可以定义以下参数:
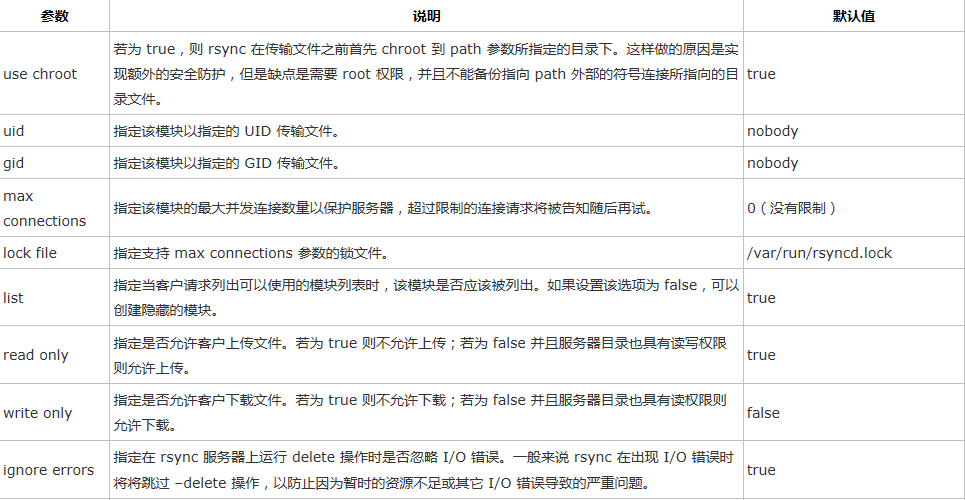
a. 基本模块参数

b. 模块控制参数

c. 模块文件筛选参数
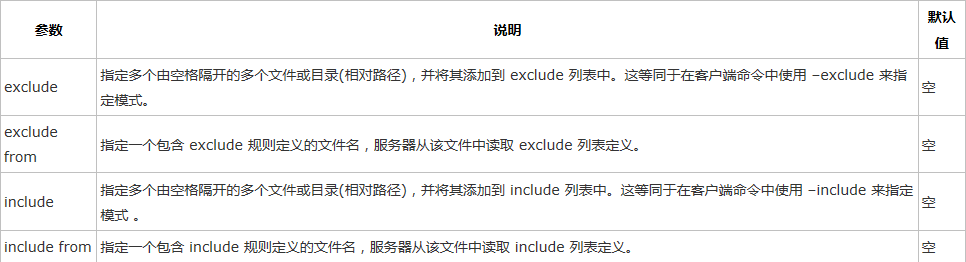
•一个模块只能指定一个exclude 参数、一个include 参数。
•结合 include 和 exclude 可以定义复杂的exclude/include 规则 。
•这几个参数分别与相应的rsync 客户命令选项等价,唯一不同的是它们作用在服务器端。
d. 模块用户认证参数

•rsync 认证口令文件的权限一定是 600,否则客户端将不能连接服务器。
•rsync 认证口令文件中每一行指定一个 用户名:口令 对,格式为:
username:passwd
•一般来说口令最好不要超过8个字符。若您只配置匿名访问的 rsync 服务器,则无需设置上述参数。
e. 模块访问控制参数

客户主机列表定义可以是以下形式:
•单个IP地址。例如:192.168.0.1
•整个网段。例如:192.168.0.0/24,192.168.0.0/255.255.255.0
•可解析的单个主机名。例如:centos,centos.bsmart.cn
•域内的所有主机。例如:*.bsmart.cn
•“*”则表示所有。
•多个列表项要用空格间隔。
f. 模块日志参数
设置了”log file”参数时,在日志每行的开始会添加”%t [%p]“。
可以使用的日志格式定义符如下所示:
•%a - 远程IP地址
•%h - 远程主机名
•%l - 文件长度字符数
•%p - 该次 rsync 会话的 PID
•%o - 操作类型:”send” 或 “recv”
•%f - 文件名
•%P - 模块路径
•%m - 模块名
•%t - 当前时间
•%u - 认证的用户名(匿名时是 null)
•%b - 实际传输的字节数
•%c - 当发送文件时,记录该文件的校验码
a. 编辑配置文件
# vi /etc/rsyncd/rsyncd.conf
# Minimal configuration file for rsync daemon
# See rsync(1) and rsyncd.conf(5) man pages for help

# This line is required by the /etc/init.d/rsyncd script
# GLOBAL OPTIONS
uid = root
gid = root

use chroot = no

read only = yes

#limit access to private LANs
hosts allow=172.16.0.0/255.255.0.0 192.168.1.0/255.255.255.0 10.0.1.0/255.255.255.0
hosts deny=*
max connections = 5

pid file = /var/run/rsyncd.pid

secrets file = /etc/rsyncd/rsyncd.secrets
#lock file = /var/run/rsync.lock

motd file = /etc/rsyncd/rsyncd.motd

#This will give you a separate log file
log file = /var/log/rsync.log

#This will log every file transferred - up to 85,000+ per user, per sync
transfer logging = yes

log format = %t %a %m %f %b
syslog facility = local3
timeout = 300

# MODULE OPTIONS
[davidhome]
path = /home/david/
list=yes
ignore errors
auth users = david
comment = David home
exclude = important/

[chinatmp]
path = /tmp/china/
list=no
ignore errors
auth users = china
comment = tmp_china
b. 建立/etc/rsyncd/rsyncd.secrets文件
# vim /etc/rsyncd/rsyncd.secrets
david:asdf           #格式   用户名:口令
china:jk               #该用户不要求是系统用户
c. 为了密码的安全性,我们把权限设为600
# chown root:root /etc/rsyncd/rsyncd.secrets
# chmod 600 /etc/rsyncd/rsyncd.secrets
d. 建立连接到服务器的客户端看到的欢迎信息文件/etc/rsyncd/rsyncd.motd
# vim /etc/rsyncd/rsyncd.motd
+++++++++++++++++++++++++++
+       David Camp        +
+++++++++++++++++++++++++++
e. 启动rsync
# /etc/init.d/xinetd restart
f. 查看873端口是否起来
# netstat -an | grep 873
如果rsync启动成功的话可以看到873端口已经在监听了。
![]()
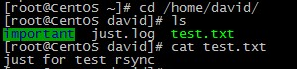
g. 服务器端文件详细
a. 客户端安装rsync
# yum -y install rsync
b. 通过rsync客户端来同步数据
场景一:
在客户端上面:
# rsync -avzP david@172.16.1.135::davidhome /tmp/david/
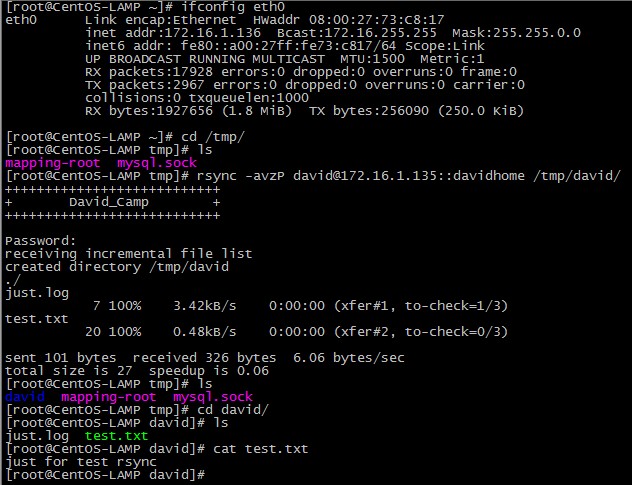
Password: 这里要输入david的密码,是服务器端提供的,在前面的例子中,我们用的是 asdf,输入的密码并不显示出来;输好后就回车;
注: 这个命令的意思就是说,用david 用户登录到服务器上,把davidhome数据,同步到本地目录/tmp/david/上。当然本地的目录是可以你自己定义的,比如 dave也是可以的;当你在客户端上,当前操作的目录下没有davidhome这个目录时,系统会自动为你创建一个;当存在davidhome这个目录中,你要注意它的写权限。
说明:
-a 参数,相当于-rlptgoD,-r 是递归 -l 是链接文件,意思是拷贝链接文件;-p 表示保持文件原有权限;-t 保持文件原有时间;-g 保持文件原有用户组;-o 保持文件原有属主;-D 相当于块设备文件;
-z 传输时压缩;
-P 传输进度;
-v 传输时的进度等信息,和-P有点关系,自己试试。可以看文档;
场景二:
# rsync -avzP --delete david@172.16.1.135::davidhome /tmp/david/
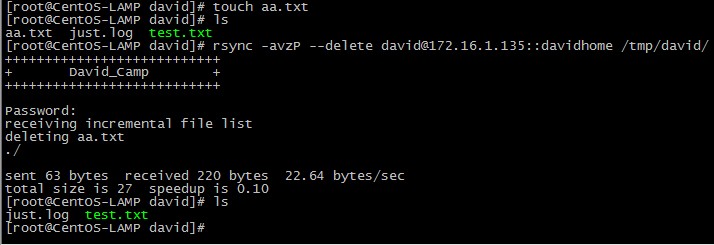
这回我们引入一个 –delete 选项,表示客户端上的数据要与服务器端完全一致,如果 /tmp/david/目录中有服务器上不存在的文件,则删除。最终目的是让/tmp/david/目录上的数据完全与服务器上保持一致;用的时候要小心点,最好不要把已经有重要数所据的目录,当做本地更新目录,否则会把你的数据全部删除;
场景三:
# rsync -avzP --delete --password-file=/tmp/rsync.password david@172.16.1.135::davidhome /tmp/david/
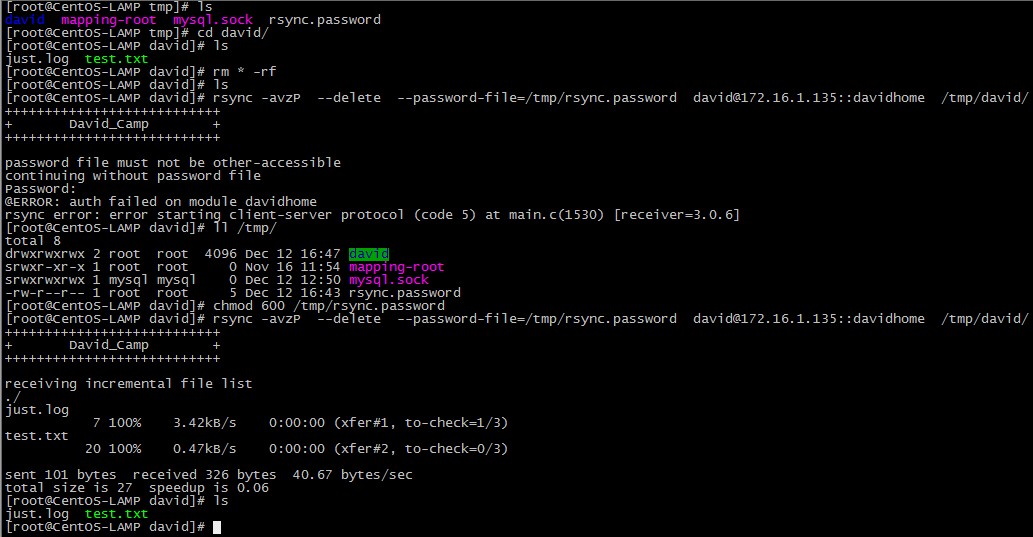
这次我们加了一个选项 –password-file=rsync.password ,这时当我们以david用户登录rsync服务器同步数据时,密码将读取 /tmp/rsync.password 这个文件。这个文件内容只是david用户的密码。我们要如下做;
# touch /tmp/rsync.password
# chmod 600 /tmp/rsync.password
# echo "asdf"> /tmp/rsync.password
# rsync -avzP  --delete  --password-file=/tmp/rsync.password  david@172.16.1.135::davidhome  /tmp/david/
注: 这样就不需要密码了;其实这是比较重要的,因为服务器通过crond 计划任务还是有必要的;
编辑crontab
# crontab -e
加入如下代码:
10 0 * * * rsync -avzP --delete --password-file=/tmp/rsync.password david@172.16.1.135::davidhome /tmp/david/
表示每天0点10分执行后面的命令。
原文来自:http://www.cnblogs.com/mchina/p/2829944.html
本文地址:https://www.linuxprobe.com/centos6-rsync-server.html编辑:逄增宝,审核员:张宏宇
本文原创地址:https://www.linuxprobe.com/centos6-rsync-server.html编辑:清蒸github,审核员:暂无