| 导读 | 在 Docker基础技术:Linux Namespace(上篇)中我们了解了,UTD、IPC、PID、Mount 四个namespace,我们模仿Docker做了一个相当相当山寨的镜像。在这一篇中,主要想向大家介绍Linux的User和Network的Namespace |

User Namespace主要是用了CLONE_NEWUSER的参数,使用了这个参数后,内部看到的UID和GID已经与外部不同了。默认情况下容器没有的UID,系统自动设置上了最大的UID65534,默认UID的定义文件在“/proc/sys/kernel/overflowuid”。
要把容器中的uid和真实系统的uid给映射在一起,需要修改 /proc/$$/uid_map 和/proc/$$/gid_map 这两个文件。这两个文件的格式为:
ID-inside-ns ID-outside-ns length
第一个字段ID-inside-ns表示在容器显示的UID或GID,
第二个字段ID-outside-ns表示容器外映射的真实的UID或GID。
第三个字段表示映射的范围,一般填1,表示一一对应。
$cat/proc/2465/uid_map
         0       1000          1
把namespace内部从0开始的uid映射到外部从0开始的uid,其最大范围是无符号32位整形
$cat/proc/$$/uid_map
          0          0          4294967295
需要注意的是:
写这两个文件的进程需要这个namespace中的CAP_SETUID (CAP_SETGID)权限(可参看Capabilities)写入的进程必须是此user namespace的父或子的user namespace进程。
另外需要满如下条件之一:
1)父进程将effective uid/gid映射到子进程的user namespace中
2)父进程如果有CAP_SETUID/CAP_SETGID权限,那么它将可以映射到父进程中的任一uid/gid。
#define _GNU_SOURCE
#include
#include
#include
#include
#include
#include
#include
#include
#include
#include
#define STACK_SIZE (1024 * 1024)
staticcharcontainer_stack[STACK_SIZE];
char*constcontainer_args[] = {
    “/bin/bash”,
    NULL
};
intpipefd[2];
voidset_map(char* file,intinside_id,intoutside_id,intlen) {
    FILE* mapfd =fopen(file,”w”);
    if(NULL == mapfd) {
        perror(“open file error”);
        return;
    }
    fprintf(mapfd,”%d %d %d”, inside_id, outside_id, len);
    fclose(mapfd);
}
voidset_uid_map(pid_t pid,intinside_id,intoutside_id,intlen) {
    charfile[256];
    sprintf(file,”/proc/%d/uid_map”, pid);
    set_map(file, inside_id, outside_id, len);
}
voidset_gid_map(pid_t pid,intinside_id,intoutside_id,intlen) {
    charfile[256];
    sprintf(file,”/proc/%d/gid_map”, pid);
    set_map(file, inside_id, outside_id, len);
}
intcontainer_main(void* arg)
{
    printf(“Container [%5d] – inside the container!/n”, getpid());
    printf(“Container: eUID = %ld;  eGID = %ld, UID=%ld, GID=%ld/n”,
            (long) geteuid(), (long) getegid(), (long) getuid(), (long) getgid());
    /* 等待父进程通知后再往下执行(进程间的同步) */
    charch;
    close(pipefd[1]);
    read(pipefd[0], &ch, 1);
    printf(“Container [%5d] – setup hostname!/n”, getpid());
    //set hostname
    sethostname(“container”,10);
    //remount “/proc” to make sure the “top” and “ps” show container’s information
    mount(“proc”,”/proc”,”proc”, 0, NULL);
    execv(container_args[0], container_args);
    printf(“Something’s wrong!/n”);
    return1;
}
intmain()
{
    constintgid=getgid(), uid=getuid();
    printf(“Parent: eUID = %ld;  eGID = %ld, UID=%ld, GID=%ld/n”,
            (long) geteuid(), (long) getegid(), (long) getuid(), (long) getgid());
    pipe(pipefd);
    printf(“Parent [%5d] – start a container!/n”, getpid());
    intcontainer_pid = clone(container_main, container_stack+STACK_SIZE,
            CLONE_NEWUTS | CLONE_NEWPID | CLONE_NEWNS | CLONE_NEWUSER | SIGCHLD, NULL);
    printf(“Parent [%5d] – Container [%5d]!/n”, getpid(), container_pid);
    //To map the uid/gid,
    //   we need edit the /proc/PID/uid_map (or /proc/PID/gid_map) in parent
    //The file format is
    //   ID-inside-ns   ID-outside-ns   length
    //if no mapping,
    //   the uid will be taken from /proc/sys/kernel/overflowuid
    //   the gid will be taken from /proc/sys/kernel/overflowgid
    set_uid_map(container_pid, 0, uid, 1);
    set_gid_map(container_pid, 0, gid, 1);
    printf(“Parent [%5d] – user/group mapping done!/n”, getpid());
    /* 通知子进程 */
    close(pipefd[1]);
    waitpid(container_pid, NULL, 0);
    printf(“Parent – container stopped!/n”);
    return0;
}
上面的程序,我们用了一个pipe来对父子进程进行同步,为什么要这样做?因为子进程中有一个execv的系统调用,这个系统调用会把当前子进程的进程空间给全部覆盖掉,我们希望在execv之前就做好user namespace的uid/gid的映射,这样,execv运行的/bin/bash就会因为我们设置了uid为0的inside-uid而变成#号的提示符。
hchen@ubuntu:~$id
uid=1000(hchen) gid=1000(hchen)groups=1000(hchen)
hchen@ubuntu:~$ ./user#< –以hchen用户运行
Parent: eUID = 1000;  eGID = 1000, UID=1000, GID=1000
Parent [ 3262] – start a container!
Parent [ 3262] – Container [ 3263]!
Parent [ 3262] – user/groupmappingdone!
Container [    1] – inside the container!
Container: eUID = 0;  eGID = 0, UID=0, GID=0#<—Container里的UID/GID都为0了
Container [    1] – setuphostname!
root@container:~# id #<—-我们可以看到容器里的用户和命令行提示符是root用户了
uid=0(root) gid=0(root)groups=0(root),65534(nogroup)
我们注意到,User Namespace是以普通用户运行,但是别的Namespace需要root权限,那么,如果我要同时使用多个Namespace,该怎么办呢?一般来说,我们先用一般用户创建User Namespace,然后把这个一般用户映射成root,在容器内用root来创建其它的Namesapce,这样可以提高容器的安全性。
在Linux下,我们一般用ip命令创建Network Namespace,但是Docker的源码中,它没有用ip命令用了Raw Socket发些“奇怪”的数据,我以ip命令分析一下。
首先,我们先看个图,下面这个图基本上就是Docker在宿主机上的网络示意图
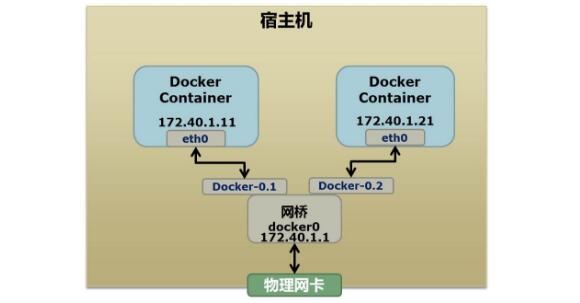
Docker在运行中可能使用到的私有网段有:172.40.1.0和10.0.0.0、192.168.0.0这三个个私有网段,如果你的环境已经使用了这三个私有网段docker启动时就会出错。当你启动一个Docker容器后,你可以使用ip link show或ip addr show来查看当前宿主机的网络情况(我们可以看到有一个docker0,还有一个veth22a38e6的虚拟网卡——给容器用的):
hchen@ubuntu:~$ ip link show
1: lo:  mtu 65536 qdisc noqueue state …
    link/loopback00:00:00:00:00:00 brd 00:00:00:00:00:00
2: eth0:  mtu 1500 qdisc …
    link/ether00:0c:29:b7:67:7d brd ff:ff:ff:ff:ff:ff
3: docker0:  mtu 1500 …
    link/ether56:84:7a:fe:97:99 brd ff:ff:ff:ff:ff:ff
5: veth22a38e6:  mtu 1500 qdisc …
    link/ether8e:30:2a:ac:8c:d1 brd ff:ff:ff:ff:ff:ff
那么,要做成这个样子应该怎么办呢?我们来看一组命令:
## 首先,我们先增加一个网桥lxcbr0,模仿docker0
brctl addbr lxcbr0
brctl stp lxcbr0 off
ifconfiglxcbr0 192.168.10.1/24up#为网桥设置IP地址
## 接下来,我们要创建一个network namespace – ns1
# 增加一个namesapce 命令为 ns1 (使用ip netns add命令)
ip netns add ns1
# 激活namespace中的loopback,即127.0.0.1(使用ip netns exec ns1来操作ns1中的命令)
ip netnsexecns1   ip linksetdev lo up
## 然后,我们需要增加一对虚拟网卡
# 增加一个pair虚拟网卡,注意其中的veth类型,其中一个网卡要按进容器中
ip link add veth-ns1typeveth peer name lxcbr0.1
# 把 veth-ns1 按到namespace ns1中,这样容器中就会有一个新的网卡了
ip linksetveth-ns1 netns ns1
# 把容器里的 veth-ns1改名为 eth0 (容器外会冲突,容器内就不会了)
ip netnsexecns1  ip linksetdev veth-ns1 name eth0
# 为容器中的网卡分配一个IP地址,并激活它
ip netnsexecns1ifconfigeth0 192.168.10.11/24up
# 上面我们把veth-ns1这个网卡按到了容器中,然后我们要把lxcbr0.1添加上网桥上
brctl addif lxcbr0 lxcbr0.1
# 为容器增加一个路由规则,让容器可以访问外面的网络
ip netnsexecns1     ip route add default via 192.168.10.1
# 在/etc/netns下创建network namespce名称为ns1的目录,
# 然后为这个namespace设置resolv.conf,这样,容器内就可以访问域名了
mkdir-p/etc/netns/ns1
echo”nameserver 8.8.8.8″>/etc/netns/ns1/resolv.conf
上面基本上就是docker网络的原理了,只不过,Docker的resolv.conf没有用这样的方式,而是用了Mount Namesapce的那种方式。另外,docker是用进程的PID来做Network Namespace的名称的。
ip link add peerAtypeveth peer name peerB
brctl addif docker0 peerA
ip linksetpeerA up
ip linksetpeerB netns ${container-pid}
ip netnsexec${container-pid} ip linksetdev peerB name eth1
ip netnsexec${container-pid} ip linkseteth1 up ;
ip netnsexec${container-pid} ip addr add ${ROUTEABLE_IP} dev eth1 ;
上面的示例是我们为正在运行的docker容器,增加一个eth1的网卡,并给了一个静态的可被外部访问到的IP地址。
这个需要把外部的“物理网卡”配置成混杂模式,这样这个eth1网卡就会向外通过ARP协议发送自己的Mac地址,然后外部的交换机就会把到这个IP地址的包转到“物理网卡”上,因为是混杂模式,所以eth1就能收到相关的数据,一看,是自己的,那么就收到。这样,Docker容器的网络就和外部通了。
当然,无论是Docker的NAT方式,还是混杂模式都会有性能上的问题,NAT不用说了,存在一个转发的开销,混杂模式呢,网卡上收到的负载都会完全交给所有的虚拟网卡上,于是就算一个网卡上没有数据,但也会被其它网卡上的数据所影响。
这两种方式都不够完美,我们知道,真正解决这种网络问题需要使用VLAN技术,Google为Linux内核实现了一个IPVLAN的驱动,这基本上就是为Docker量身定制的。
首先我们运行一下上篇中的那个pid.mnt的程序(也就是PID Namespace中那个mount proc的程序),然后不要退出。
$ sudo ./pid.mnt
[sudo] passwordforhchen:
Parent [ 4599] – start a container!
Container [    1] – inside the container!
然后我们到另一个shell中查看一下父子进程的PID:
hchen@ubuntu:~$ pstree -p 4599
pid.mnt(4599)───bash(4600)
我们可以到proc下(/proc/$$/ns)查看进程的各个namespace的id(内核版本需要3.8以上)。
下面展示的是父进程的:
hchen@ubuntu:~$sudols-l/proc/4599/ns
total 0
lrwxrwxrwx 1 root root 0  4月  7 22:01 ipc -> ipc:[4026531839]
lrwxrwxrwx 1 root root 0  4月  7 22:01 mnt -> mnt:[4026531840]
lrwxrwxrwx 1 root root 0  4月  7 22:01 net -> net:[4026531956]
lrwxrwxrwx 1 root root 0  4月  7 22:01 pid -> pid:[4026531836]
lrwxrwxrwx 1 root root 0  4月  7 22:01 user -> user:[4026531837]
lrwxrwxrwx 1 root root 0  4月  7 22:01 uts -> uts:[4026531838]
下面是展示的是子进程的:
hchen@ubuntu:~$sudols-l/proc/4600/ns
total 0
lrwxrwxrwx 1 root root 0  4月  7 22:01 ipc -> ipc:[4026531839]
lrwxrwxrwx 1 root root 0  4月  7 22:01 mnt -> mnt:[4026532520]
lrwxrwxrwx 1 root root 0  4月  7 22:01 net -> net:[4026531956]
lrwxrwxrwx 1 root root 0  4月  7 22:01 pid -> pid:[4026532522]
lrwxrwxrwx 1 root root 0  4月  7 22:01 user -> user:[4026531837]
lrwxrwxrwx 1 root root 0  4月  7 22:01 uts -> uts:[4026532521]
我们可以看到,其中的ipc,net,user是同一个ID,而mnt,pid,uts都是不一样的。如果两个进程指向的namespace编号相同,就说明他们在同一个namespace下,否则则在不同namespace里面。一旦这些文件被打开,只要其fd被占用着,那么就算PID所属的所有进程都已经结束,创建的namespace也会一直存在。比如:我们可以通过:mount –bind /proc/4600/ns/uts ~/uts 来hold这个namespace。
另外,我们在上篇中讲过一个setns的系统调用,其函数声明如下:
intsetns(intfd,intnstype);
其中第一个参数就是一个fd,也就是一个open()系统调用打开了上述文件后返回的fd,比如:
fd = open(“/proc/4600/ns/nts”, O_RDONLY); // 获取namespace文件描述符
setns(fd, 0);// 加入新的namespace
原文来自:http://os.51cto.com/art/201609/517641.htm
本文地址:https://www.linuxprobe.com/docker-linux-namespace-2.html编辑员:陶武杰,审核员:苏西云
本文原创地址:https://www.linuxprobe.com/docker-linux-namespace-2.html编辑:public,审核员:暂无