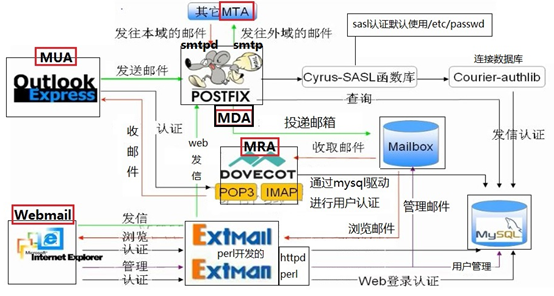
上图是一个几乎完整的邮件系统架构图,这里基于Mysql数据库进行用户认证,不管是Postfix、Dovecot、webmail都需要去Mysql数据库中进行用户认证。
1、用户可以基于outlook连接postfix然后通过Courier-authlib连接到Mysql进行认证,认证成功就可以发送邮件。前面我们也是用Cyrus-sasl进行shadow用户认证,其实Cyrus-sasl也同样支持Mysql认证。但是由于驱动比较底层配置起来比较繁琐,所以选用Courier-authlib进行认证,但是从上图可以看出我们是postfix还是借用Cyrus-sasl函数库与Courier-authlib进行连接。同样的道理Postfix也可以直接连接到Courier-authlib但是比较麻烦。
2、用户可以基于outlook连接Dovecot然后直接到mysql进行认证,认证成功就可以接收Mailbox中的邮件。这里比较简单,因为Dovecot自身支持到Mysql的认证。
3、用户可以基于webmail进行收发邮件,同样通过Extmail/Extman到Mysql中认证,认证成功。就可以基于postfix发邮件,基于Dovecot收邮件。但是Extmail/Extman自身就可以到Mailbox中收取邮件。
Courier 是一个优秀的电子信件系统,拥有一个完整的邮件系统:其提供MTA(Courier-MTA),MDA(Maildrop),MUA,MRA(Courier-IMAP),SASL(Courier-authlib)WebMail(sqwebmail)等这些组件。
Courier-authlib是Courier组件中的认证库,它是courier组件中一个独立的子项目,用于为Courier的其它组件提供认证服务。其认证功能通常包括验正登录时的帐号和密码、获取一个帐号相关的家目录或邮件目录等信息、改变帐号的密码等。而其认证的实现方式也包括基于PAM通过/etc/passwd和/etc/shadow进行认证,基于GDBM或DB进行认证,基于LDAP/MySQL/PostgreSQL进行认证等。因此,courier-authlib也常用来与courier之外的其它邮件组件(如postfix)整合为其提供认证服务。
[root@localhost ~]# yum install libtool-ltdl libtool-ltdl-devel
[root@localhost ~]# yum install expect
[root@localhost ~]# groupadd -g 1001 vmail
[root@localhost ~]# useradd vmail -u 1001 -g 1001
[root@localhost ~]# tar xvf courier-authlib-0.66.1.tar.bz2 -C /usr/src/
[root@localhost ~]# cd /usr/src/courier-authlib-0.66.1
[root@localhost courier-authlib-0.66.1]# ./configure \
--prefix=/usr/local/courier-authlib \
--sysconfdir=/etc \
--without-authpam \
--without-authshadow \
--without-authvchkpw \
--without-authpgsql \
  #以上without是不支持此类认证免得需要安装依赖的数据包
--with-authmysql \
  #基于mysql认证
--with-mysql-libs=/usr/lib64/mysql \
--with-mysql-includes=/usr/include/mysql \
  #需要mysql的头文件和库文件路径一定要正确
--with-redhat \
  #如果是redhat系统会实现自我优化;如果不是就不要加了
--with-authmysqlrc=/etc/authmysqlrc \
  #提供给mysql的配置文件,记录认证怎样跟数据进行交互
--with-authdaemonrc=/etc/authdaemonrc \
  #courier-authlib自身是一个服务进程所以也需要一个配置文件
--with-mailuser=vmail \
--with-mailgroup=vmail \
  #用户邮件收发管理的用户和组
[root@smtp ~]# make && make install
[root@localhost ~]# chmod 755 /usr/local/courier-authlib/var/spool/authdaemon
  #调整一下authdaemon的权限(存放进程套接字)

[root@localhost ~]# cp -p /etc/authdaemonrc.dist  /etc/authdaemonrc
  #调整courier文件名,因--with-authdaemonrc=/etc/authdaemonrc指定了文件名

[root@localhost ~]# cp -p /etc/authmysqlrc.dist  /etc/authmysqlrc
  #调整跟mysql交互文件名,因--with-authmysqlrc=/etc/authmysqlrc指定了文件名
[root@localhost ~]# vim /etc/authdaemonrc
authmodulelist="authmysql"
  #指定认证模块为authmysql
authmodulelistorig="authmysql"
  #认证的原始模块只保留authmysql
daemons=10
  #修改默认开启进程
#DEBUT-LOGIN=2
  #如果使用虚拟用户登录有问题就打开调试功能看看日志;不然不要打开
[root@localhost ~]# vim /etc/authmysqlrc
MYSQL_SERVER localhost
  #指定Mysql服务器地址
MYSQL_USERNAME extmail
  #连接数据库的用户名(如果不使用extmail,那么在extman中需要重新指定账号)
MYSQL_PASSWORD extmail
  #用户密码
MYSQL_PORT 3306
  #指定你的mysql的端口(使用socket通信就不用端口)
MYSQL_SOCKET /var/lib/mysql/mysql.sock
  #Mysql的套接字文件
MYSQL_DATABASE  extmail
  #存储用户的库(如果不使用extmail,那么在extman中都要更改)
MYSQL_USER_TABLE  mailbox
  #存储用户的表(mailbox是extman帮我们自动生成的不能改)
MYSQL_CRYPT_PWFIELD  password
  #认证密码字段
MYSQL_UID_FIELD  '1001'
  #vmail用户的UID
MYSQL_GID_FIELD  '1001'
  #vmail用户的GID
MYSQL_LOGIN_FIELD  username
  #认证账号字段
MYSQL_HOME_FIELD  concat('/var/mailbox/',homedir)
  #concat是mysql的一个函数用来把/var/mailbox/跟homedir连接成一个路径(homedir是mysql的一个变量值为每一个用户名)
MYSQL_NAME_FIELD  name
  #用户全名字段,默认
MYSQL_MAILDIR_FIELD  concat('/var/mailbox/',maildir)
  #虚拟用户的邮件目录
[root@localhost ~]# cd /usr/src/courier-authlib-0.66.1/
[root@localhost courier-authlib-0.66.1]# cp courier-authlib.sysvinit /etc/rc.d/init.d/courier-authlib
[root@localhost ~]# chmod 755 /etc/init.d/courier-authlib
[root@localhost ~]# chkconfig --add courier-authlib
[root@localhost ~]# chkconfig courier-authlib on
[root@localhost ~]# service courier-authlib start
Starting Courier authentication services: authdaemond
PS:可以使用pstree -a可以看到authdaemond已经生成了11个进程,我们开启了10个,但是有一个主进程负责生成其他进程。
[root@localhost ~]# mkdir -pv /var/mailbox
[root@localhost ~]# chown -R vmail /var/mailbox
PS:邮箱目录属主为vmail
Postfix的SMTP认证需要透过Cyrus-SASL连接到authdaemon获取认证信息
[root@localhost ~]# vim /usr/lib64/sasl2/smtpd.conf
#pwcheck_method: saslauthd
#mech_list: PLAIN LOGIN
#注释前面实验使用SASL认证的参数
pwcheck_method: authdaemond
log_level: 3
mech_list:PLAIN LOGIN
authdaemond_path:/usr/local/courier-authlib/var/spool/authdaemon/socket
[root@localhost ~]# vim /etc/postfix/main.cf
#################Virtual Mailbox Settings###################
virtual_mailbox_base = /var/mailbox
  #用户邮箱目录(跟这个参数MYSQL_HOME_FIELD定义的要一致)
virtual_mailbox_maps = mysql:/etc/postfix/mysql_virtual_mailbox_maps.cf
  #用来查询用户账号信息(这个配置文件中定义了SQL语句,使用extmail用户)
virtual_mailbox_domains = mysql:/etc/postfix/mysql_virtual_domains_maps.cf
  #用来查询虚拟域
virtual_alias_domains =
virtual_alias_maps = mysql:/etc/postfix/mysql_virtual_alias_maps.cf
  #用来查询用户别名
virtual_uid_maps = static:1001
virtual_gid_maps = static:1001
  #每一个虚拟用户都映射为系统用户vmail
virtual_transport = virtual
  #指定MDA专门为虚拟用户投递代理
virtual_mailbox_limit = 20971520
  #磁盘配额
[root@localhost ~]# yum install httpd
需要使用源码extman目录下docs目录中的extmail.sql和init.sql建立数据库extmail
[root@localhost ~]# tar zxvf extman-1.1.tar.gz -C /usr/src/
[root@localhost ~]# cd /usr/src/extman-1.1/docs
[root@localhost docs]# service mysqld restart
[root@localhost docs]# mysql -u root < extmail.sql
[root@localhost docs]# mysql -u root < init.sql
[root@localhost docs]# mysql -u root -B -e "show databases;"
Database
information_schema
extmail
mysql
test
#对于MySQL-5.1以后版本,其中的服务脚本extmail.sql执行会有语法错误,因为MySQL-5.1使用的默认存储引擎是MyISAM,而在MySQL-5.1之后使用的是InnoDB存储引擎。可先使用如下命令修改extmail.sql配置文件而后再执行修改方法如下:
sed -i ‘s@TYPE=MyISAM@ENGINE=InnoDB@g’ extmail.sql
#这里我使用的是PRM包,所以MySQL是5.1版本的,不用修改SQL脚本。
这两个SQL脚本会创建extmail数据库和表,以及extmail、webman用户。所以需要授予用户extmail访问extmail数据库的权限(生产环境中extmail给select权限,因为它只需要检索用户即可)。同时这里的密码设置为extmail同上面的配置文件一样,不然都要改。
mysql> GRANT all privileges on extmail.* TO extmail@localhost IDENTIFIED BY 'extmail';
mysql> GRANT all privileges on extmail.* TO extmail@127.0.0.1 IDENTIFIED BY 'extmail';
mysql> flush privileges;
[root@localhost ~]# cd /usr/src/extman-1.1/docs
[root@localhost docs]# cp mysql_virtual_mailbox_maps.cf /etc/postfix/
[root@localhost docs]# cp mysql_virtual_domains_maps.cf /etc/postfix/
[root@localhost docs]# cp mysql_virtual_alias_maps.cf /etc/postfix/
[root@localhost docs]# cp mysql_virtual_limit_maps.cf /etc/postfix/
打开一个文件看看
[root@localhost ~]# cat /etc/postfix/mysql_virtual_domains_maps.cf
user = extmail
password = extmail
hosts = localhost
dbname = extmail
table = domain
select_field = domain
where_field = domain
additional_conditions = AND active = ‘1’
PS:所以在通过mysql认证配置文件/etc/authmysqlrc中的账号密码很多地方都要用到,生产环境中全部都要统一修改。
使用虚拟域的时候,就需要取消中心域的使用,myhostname、mydomain、myorigin、mydestination,所以现在main.cf配置文件需要添加的参数如下所示:
[root@localhost ~]# vim /etc/postfix/main.cf
#################Center Domain Settings###########
mynetworks = 127.0.0.0/8
#mydestination = $myhostname, localhost.$mydomain, localhost, $mydomain
#myhostname = smtp.ywnds.com
#mydomain = ywnds.com
#myorigin = $mydomain
#home_mailbox = Maildir/
[root@localhost ~]# vim /etc/dovecot/dovecot.conf
#Ssl = no
#disable_plaintext_auth = no
#mail_location = maildir:~/Maildir

#把dovecot主配置文件/etc/dovecot/dovecot.conf中刚开始添加的几行数据注释掉

[root@localhost ~]# vim /etc/dovecot/conf.d/10-mail.conf
mail_location = maildir:/var/mailbox/%d/%n/Maildir

  #添加此行指定邮件的提取位置
[root@localhost ~]# vim /etc/dovecot/conf.d/10-auth.conf
disable_plaintext_auth = no
  #开启明文验证(可以选择把dovecot.conf配置文件中的此参数关闭)
auth_mechanisms = plain login
  #支持验证方法
#!include auth-system.conf.ext
  #取消默认系统验证
!include auth-sql.conf.ext
  #开启mysql验证
#auth_verbose = yes
  #认证详细日志,调试可以打开
[root@localhost ~]# vim /etc/dovecot/conf.d/auth-sql.conf.ext
passdb {
  driver = sql
  #args = /etc/dovecot/dovecot-sql.conf.ext
  args = /etc/dovecot/dovecot-sql.conf
}
userdb {
  driver = sql
  #args = /etc/dovecot/dovecot-sql.conf.ext
  args = /etc/dovecot/dovecot-sql.conf
}
PS:在这个MySQL验证文件中指定了用户的账号和密码需要通过/etc/dovecot/dovecot-sql.conf这个文件去数据库中取。
[root@localhost ~]# vim /etc/dovecot/dovecot-sql.conf
driver = mysql
connect = host=localhost dbname=extmail user=extmail password=extmail
default_pass_scheme = CRYPT
password_query = SELECT username AS user,password AS password FROM mailbox WHERE username = '%u'
user_query = SELECT maildir,uidnumber AS uid,gidnumber AS gid FROM mailbox WHERE username = '%u'

解释:

Driver
  #Dovecot使用自带的驱动连接MySQL

Connect
  #连接本地mysql;数据库extmail;用户extmail;密码extmail。
  #说明:如果mysql服务器是本地主机,即host=localhost时,如果mysql.sock文件不是默认的/var/lib/mysql/mysql.sock,可以使用host=“sock文件的路径”来指定新位置;
  #例如,使用通用二进制格式安装的MySQL,其sock文件位置为/tmp/mysql.sock,相应地,connect应按如下方式定义connect = host=/tmp/mysql.sock dbname=extmail user=extmail password=extmail。

Default_pass_scheme
  #表明我们的密码为加密存放

Password_query
  #找密码查询哪个字段

User_query
  #找账号查询哪个字段
 PS:dovecot其实也提供了这么一个配置文件模板,在/usr/share/doc/dovecot-2.0.9/example-config/dovecot-sql.conf.ext
[root@localhost ~]# service dovecot restart
[root@localhost ~]# service postfix restart
[root@localhost ~]# service courier-authlib restart
[root@localhost ~]# service mysqld restart
[root@localhost ~]# /usr/local/courier-authlib/sbin/authtest -s login postmaster@extmail.org extmail
Authentication succeeded.
原文来自:http://www.ywnds.com/?p=1797
本文地址:https://www.linuxprobe.com/linux-postfix-6.html编辑:xiangping wu,审核员:逄增宝
Linux命令大全:https://www.linuxcool.com/
Linux系统大全:https://www.linuxdown.com/
红帽认证RHCE考试心得:https://www.rhce.net/