| 导读 | Ansible 是一个开源的配置管理工具,我们用于自动化任务、部署应用程序。使用 Ansible,您可以自动执行日常任务,例如更新系统、安装软件、和配置服务。 |
觉得用ip地址麻烦,可以在Master控制节点中的/etc/hosts文件中添加主机名对应着节点名称:
[root@Master ~]# cat /etc/hosts
127.0.0.1   localhost localhost.localdomain localhost4 localhost4.localdomain4
::1         localhost localhost.localdomain localhost6 localhost6.localdomain6
192.168.43.131 Master
192.168.43.165 node1
192.168.43.166 node2
192.168.43.167 node3

在上一篇文章中,创建了一个名为 Master 的控制节点和四个受控节点(node1、node2、node3 和 node4)。现在,为了让 Ansible 与受控节点通信,需要为Master节点的ansible用户配置免密登录四个受控节点。
在Master和node1-node4中都需要创建ansible用户:
# 在Master节点创建用户,添加到wheel组,并设置ansible用户密码
[root@Master ~]# useradd ansible
[root@Master ~]# usermod -aG wheel ansible
[root@Master ~]# echo '123'|passwd --stdin ansible
Changing password for user ansible.
passwd: all authentication tokens updated successfully.
# 在node1节点创建用户,添加到wheel组,并设置ansible用户密码
[root@node1 ~]# useradd ansible
[root@node1 ~]# usermod -aG wheel ansible
[root@node1 ~]# echo '123'|passwd --stdin ansible
Changing password for user ansible.
passwd: all authentication tokens updated successfully.
# 在node2节点创建用户,添加到wheel组,并设置ansible用户密码
[root@node2 ~]# useradd ansible
[root@node2 ~]# usermod -aG wheel ansible
[root@node2 ~]# echo '123'|passwd --stdin ansible
Changing password for user ansible.
passwd: all authentication tokens updated successfully.
# 在node3节点创建用户,添加到wheel组,并设置ansible用户密码
[root@node3 ~]# useradd ansible
[root@node3 ~]# usermod -aG wheel ansible
[root@node3 ~]# echo '123'|passwd --stdin ansible
Changing password for user ansible.
passwd: all authentication tokens updated successfully.
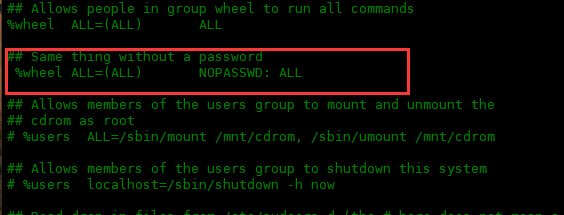
在Master和node1-node4中执行visudo命令,将%wheel ALL=(ALL) NOPASSWD: ALL前面的注释去掉,这样ansible用户使用sudo时不需要输入密码了:
[root@Master ~]# visudo
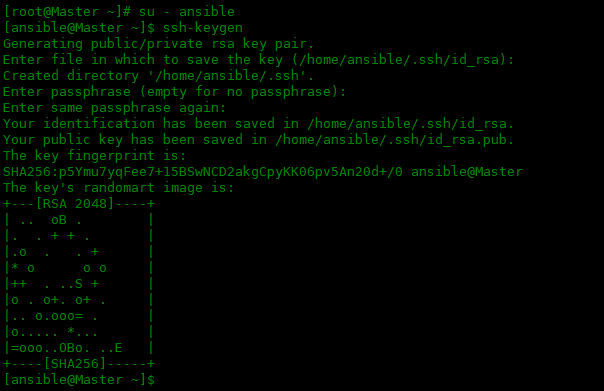
在控制节点Master上切换到ansible用户,生成 SSH 密钥,然后将 SSH 公钥复制到所有受控节点。
[root@Master ~]# su - ansible
[ansible@Master ~]$ ssh-keygen
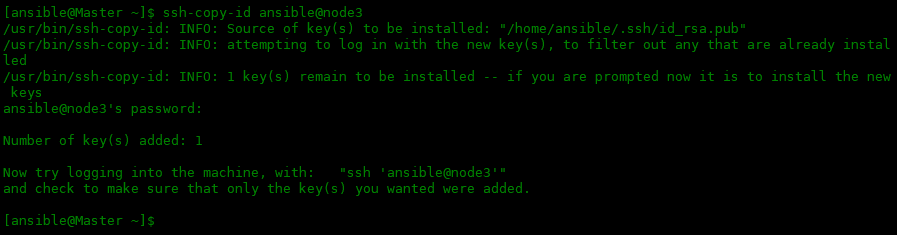
现在,将 SSH 公钥复制到所有受控节点,这让 ansible 用户无需输入密码即可登录所有节点主机了:
[ansible@Master ~]$ ssh-copy-id ansible@node1
[ansible@Master ~]$ ssh-copy-id ansible@node2
[ansible@Master ~]$ ssh-copy-id ansible@node3
默认的 Ansible 配置文件位于 /etc/ansible/ansible.cfg 下。Ansible 的大部分设置都可以使用此配置文件进行修改以满足环境需求,下面了解一下 Ansible 在哪里搜索配置文件,Ansible 按以下顺序搜索配置文件,ansible找到的第一个配置文件,然后忽略其余文件:
$ANSIBLE_CONFIG如果设置了此变量ansible.cfg如果在当前目录中~/.ansible.cfg如果它在用户的主目录中。/etc/ansible/ansible.cfg默认的配置文件
默认清单文件位于 /etc/ansible/hosts 中,但可以在配置文件中更改此位置。您还可以通过-i选项指定要使用的清单文件。
下面在ansible的家目录创建一个~/.ansible.cfg配置文件,然后创建一个inventory清单文件:
[ansible@Master ~]$ touch ~/.ansible.cfg
[ansible@Master ~]$ touch inventory
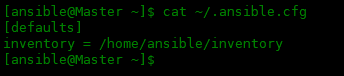
在~/.ansible.cfg中制定inventory文件的位置:
[ansible@Master ~]$ cat ~/.ansible.cfg

[defaults]
inventory = /home/ansible/inventory
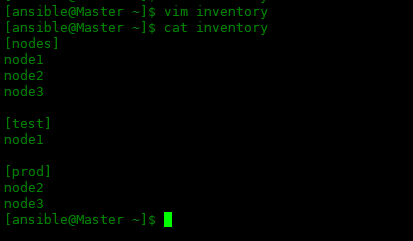
下面将主机节点写入到inventory文件中,内容中创建了三个组,nodes、test、prod:
[ansible@Master ~]$ vim inventory

[nodes]
node1
node2
node3

[test]
node1

[prod]
node2
node3
ad-hoc可以在命令行快速执行命令,不需要编写playbook。
使用 ping 模块检查与节点主机的连接。
[ansible@Master ~]$ ansible all -m ping
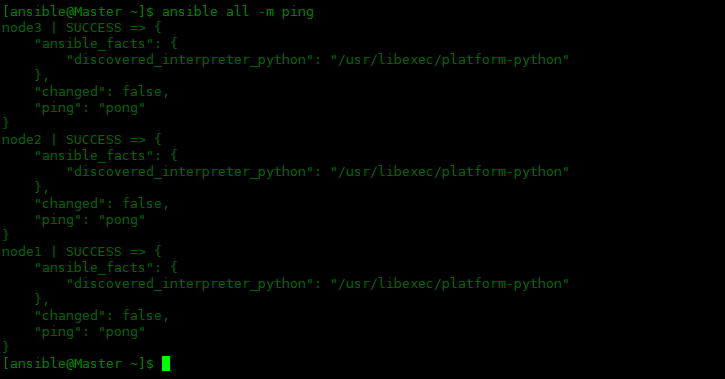
在上面的命令中,all 表示让 Ansible 在所有主机上运行此命令。
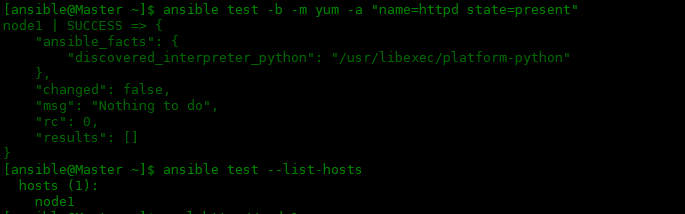
使用 Ansible 的ad-hoc命令,还可以将软件包安装到节点主机。下面实例是将httpd安装在[test]组中:
[ansible@Master ~]$ ansible test -b -m yum -a "name=httpd state=present"
node1 | SUCCESS => {
    "ansible_facts": {
        "discovered_interpreter_python": "/usr/libexec/platform-python"
    },
    "changed": false,
    "msg": "Nothing to do",
    "rc": 0,
    "results": []
}
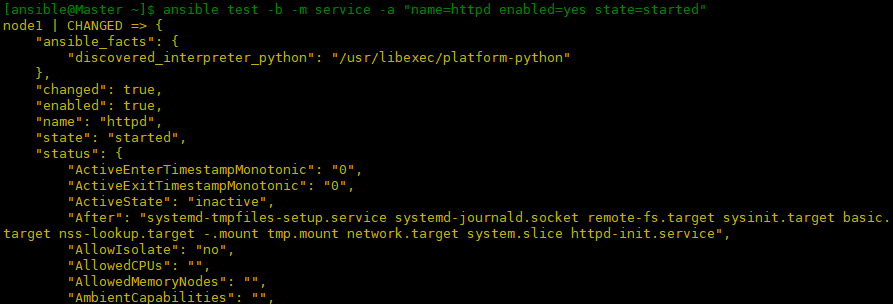
由于在上一步中成功安装了 httpd 服务器,下面使用 Ansible 的 ad-hoc 命令启动和启用 httpd 服务,以便 Web 服务器启动并运行。
[ansible@Master ~]$ ansible test -b -m service -a "name=httpd enabled=yes state=started"
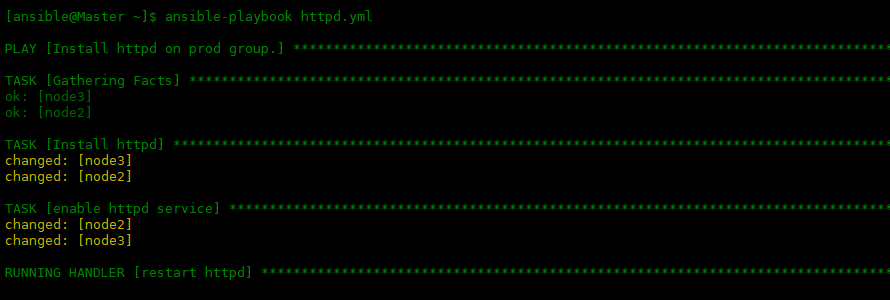
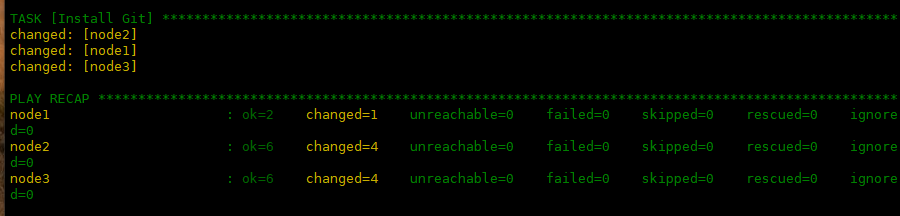
与 Ansible ad-hoc命令不同,Ansible 剧本可以保存和重复使用。每个playbook 由一个或多个playbook组成。下面是一个简单的 Ansible 剧本,在不同的节点安装不同的服务。下面实例文件名为httpd.yaml,用于在 prod 组安装 httpd 服务,启动服务,防火墙开放80端口。然后再所有节点安装git安装包:
# 在vim编辑器中添加这条信息,让缩进更方便一些。
[ansible@Master ~]$ echo 'autocmd FileType yaml setlocal ai ts=2 sw=2 et' > .vimrc
[ansible@Master ~]$ vim httpd.yml
---
- name: Install httpd on prod group.
  hosts: prod
  become: yes
  tasks:
  - name: Install httpd
    yum:
      name: httpd
      state: latest
  - name: enable httpd service
    service:
      name: httpd
      enabled: yes
    notify: restart httpd
  handlers:
  - name: restart httpd
    service:
      name: httpd
      state: restarted

- name: Install git on all hosts
  hosts: all
  become: yes
  tasks:
  - name: Install Git
    yum:
      name: git
      state: latest
编写完成playbook时,可以试运行一下,然后再真正的运行:
[ansible@Master ~]$ ansible-playbook httpd.yml -C
[ansible@Master ~]$ ansible-playbook httpd.yml
Ansible 简单、易于设置且功能强大。Ansible 是无代理的,这使系统管理员可以轻松开始自动化并花费更少的时间进行配置。
本文原创地址:https://www.linuxprobe.com/centos8-ansible-two.html编辑:逄增宝,审核员:暂无